skip to main |
skip to sidebar
It is nearly the end of July and with only one month remaining to work on the Major Project it is important to consider how the project is progressing and if the work is on schedule.

The code is complete and has been fully implemented. It is important to now focus on testing the prototype and completing the supporting documentation.
The Major Project is running to schedule.
The IOCT Masters Showcase Event at The Phoenix on Friday, 25th of July 2008 offered an opportunity to demonstrate the game and get feedback from players.
Feedback was extremely positive, with people staying to play the game for a while. Comments suggested that the game was interesting to play and once you had started playing you didn’t want to stop, and also suggested it would be better to play the game on a faster computer in order for the game to run slightly smoother. This is an issue I was already aware of and was just demonstrating the game on the laptop I have been using to code it on. Ideally, I would have demonstrated the game on a desktop computer, however, I did not have access to one during the event.
Other comments suggested that people liked the design of the bricks in the different levels, as I had created posters to show print screens of the different levels. People were keen to play the game and interested in how the object detection worked, asking about how the movement of the AIBO ball (used as I only had a limited space in which to demonstrate my work) controlled the paddle on the screen.
A similar method is used when saving the high scores, as the method for reading the high scores. Instead, to save the high scores the external file is written to, using “fileHandle = fopen(“highscores.txt”,”w”);”.
This line of code opens the relevant file for writing and I have then used “fprintf” to write a string (the player name), tab a space, an integer (the player score) and created a new line. To end this command, I have then used the code line “fclose(fileHandle);”.
As a player adds their name and score to the High Score Board the list of highest scores must be resorted into order. The highest score list should have the highest high score at the top and the lowest high score at the bottom.
In the code I have set three integer variables and three character strings, followed by a set of if and else statements to sort the order of the score board once a new high scorer’s name and score have been added to the list.

I have decided to include the following items in this screen:
- Title of screen
- Three letters that can be changed
- An OK button to confirm the name and move on to the next screen
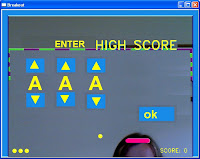 Here is the initial design for the screen, created on the computer.
The design of each button includes:
- Main colour fill
- Highlight colour along the top edge of the button
- Highlight colour down the right side of the button
- Lowlight colour along the bottom edge of the button
- Lowlight colour down the left side of the button
There are three types of button:
- Go up one letter when the crosshair is held over the button for two consecutive frames
- Lower button
- Go down one letter when the crosshair is held over the button for two consecutive frames
- OK button
- Larger than the other buttons so that it is visually obvious
- When crosshair is held over the button for two consecutive frames, allows the name to be saved to the external text file, the order of the scores and names are reorganised in the external file and the View High Score Board screen is then displayed.
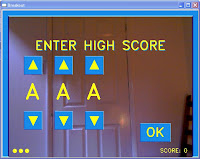 The final version of the Enter High Score Board.
 I now have the gym ball, the main controller for the game. During code development I have been using an AIBO ball, as it is very similar in terms of hue and saturation. The AIBO ball has been extremely useful, not only because of it’s colour related properties, but also because of it’s size. The AIBO ball is far smaller than the gym ball and is therefore easier to use when sitting at the computer working on the code.
The larger gym ball will be used for the game, as planned, as I believe it offers the player a more interesting gaming experience than playing with the AIBO ball. Playing with the larger ball requires the player to stand further from the screen on which the game is displayed and in turn offers the opportunity to include more players at one time as the ball can be moved anywhere within the cameras viewing range.
Having all of the code for the game in one file was making working on the file difficult, especially when trying to find certain sections of the code. I have created a header file, which is then called by each of the other .c files, allowing them to compile.
The header file includes:
- Libraries and includes
- Define constants
- Structures
- Global variables
- Game items
- Image
- Function prototypes

The code has been separated into suitable sections, with the .c files including:
- Breakout_v3.c
- Breakout_v3.h
- Collision_Detection.c
- Drawing.c
- High_Score.c
- Levels.c
- Sound.c
 To code the brick collision effects I have included checks in an if statement, to check once the brick has been hit if the hit number matches the level number. In the first level, if the brick has been hit once then the player will hear an explosion effect whilst the brick disappears. In the second level of the game, the first time a brick is hit (which is one number less than the level number) the player hears a collision noise and cracks appear on the brick. The second time a brick is hit (the same number of hits as the level number) the player hears an explosion noise and the brick disappears. In the third level, the first hit creates a collision noise and two cracks appear on the brick (this is two hits less than the level number), the second hit creates a collision noise and another crack appears (this is one hit less than the level number) and the third hit causes an explosion noise and the brick disappears (as the hit number equals the level number).
In order for the player to know when the ball collides with a brick I have decided to make this clear through the use of visual and audio techniques. This will give the player(s) an indication that a brick has been hit and that the computer has recognised this. Cracks have been coded to represent bricks which have been hit but have not yet been hit enough times to be deleted (the brick has not been hit the same number of times as the level number).
The range of audio and visual effects that occur when a brick is hit include:
Level 1: Brick hit first time = Explosion noise, brick disappears
Level 2: Brick hit first time = Collision noise, cracks appear on the brick
Level 2: Brick hit second time = Explosion noise, brick disappears
Level 3: Brick hit first time = Collision noise, cracks appear on the brick
Level 3: Brick hit second time = Collision noise, another crack appears on the brick
Level 3: Brick hit third time = Explosion noise, brick disappears
This requires the code used for the brick disappearing, first set of cracks and second set of cracks and also the explosion and collision sound effects.
Having added sound effects to the game and understood how the MIDI signals can be used, I have also decided to include some musical elements. I feel the introduction to the game and the congratulations screen would benefit from having music playing alongside the visual image.
For the congratulations screen, I feel it appropriate to use Cliff Richard's "Congratulations". In order to code this, I researched and found a piano score on the Internet to find which notes are used in the chorus, the length of the notes and where the rests are in each bar. I then used a conversion list to convert the pitch musical notes into code and was able to write a piece of code to play the chorus of "Congratulations".
Here is the code I wrote for "Congratulations":
I have researched the ways to add sound effects using c code and OpenCV. The best way appears to be to use a Musical Instrument Digital Interface (MIDI) voice. MIDI works by transmitting digital data about the pitch, intensity and length of notes, for example.
In the code I set up sound as an integer variable to include:
- Frequency (as a floating point number)
- Duration (as an integer variable)
- Volume (as an integer variable)
- Voice (as an integer variable)
- Tempo (as a floating point number)
Volume ranges from 0 – 127, or off to loudest
Voice ranges from 0 – 127, each number representing a different voice or instrument effect
This took some time for experimentation and research to find the noises I wanted to include in the game.
A sample of the code looks like this:

I have carried out some research into the use of sound in game and have decided to add sound to the game, to make playing the game a more interesting experience, as it involves more of the senses.
Times in the game that may benefit from sound:
- Ball and border collision
- Ball and paddle collision
- Ball and brick collision
- Brick explosion
Other times during the game when sound effects or music could be used:
- Losing a “life”
- Completing a level
- Congratulation state
- During the countdown
- Introduction to the game
The calculations shown in this blog are for the first row of bricks. The calculations are the same for each row, changing the number in the code, for example, bricks1 is used for the first row, bricks 2 for the second row and so on.
The collisions to the sides of the brick when the ball is travelling from above are the same as when the ball is travelling from below.
The code for this is similar to collision detection when the ball is travelling to the left, using i+1 instead of i-1, as used when the ball is travelling to the left.
 x1 = (bricks1[i+1].posx – bricks1[i+1].halfwidth) – prevballx – gameball.radius + 4;
Again, check that the collision occurs between the top and bottom of the brick, add one to the hit count each time a brick is hit, add ten to the score when a brick is deleted, reverse the ball direction, calculate the final ball position and check if the level has been completed.
Collision on the side of a brick only occurs when the ball is travelling sideways and the brick next to it no longer exists. I need to create an if statement, which says if the ball is travelling to the left, but do not check if the brick being hit is the left-most brick (as there is no brick to the left of it to be hit), then check the side collision.
 x1 = prevballx – (bricks1[i-1].posx + bricks1[i-1].halfwidth) – gameball.radius – 4;
t = (float)*1 / (float)gameball.velx;
y1 = (int) (t*(float)gameball.vely);
tempballposx = prevballx + x1;
tempballposy = prevbally + y1;
//Check that the collision is between the top and bottom of the brick
if (bricks1[i-1].posy + bricks1[i-1].halfheight + 7 >= tempballposy && bricks1[i-1].numberhits < level)
{
bricks1[i-1].numberhits ++; //Add one to hit count
if (bricks1[i-1].numberhits == level); //Set up to check if brick hits equals level number then a sound effect could be added later
}
score = score+10; //Add 10 to the score each time a brick is deleted
gameball.velx = - gameball.velx; //Reverse the direction of the ball
gameball.posx = tempballposx + (int) ((1.0-t)*(float)gameball.velx); //Calculate the final ball position
gameball.posy = - tempballposy + (int) ((1.0-t)*(float)gameball.vely); //Calculate the final ball position
checklevelcomplete(); //Check if the level has been completed
Meeting with Project Supervisor, Mohammad Ibrahim
Friday 19th June
2.15pm
I demonstrated a version of my work and talked Mohammad through the code. I answered questions relating to the working process and the code itself. We discussed possible directions for the project, such as potentially adding sound. I had not previously considered incorporating sound into the game, as I was not sure exactly how tight time constraints would be (having never programmed a game before), however, Mohammad believes that I am working and progressing well and may have time to add additional aspects to the game.
 Collision detection to the top edge of the brick when the ball is travelling from above.
y1 = previous ball posy – bricks1[0].posy – bricks1[0].halfheight – radius – 1
t = y1/vely
x1 = t*velx
tempballposx = previous ball posx – x1
tempballposy = previous ball posy – y1
for (i=0; i<12; i++)
if (tempballposx >= bricks1[i].posx – halfwidth && tempballposx =< bricks1[i].posx + halfwidth)
if (bricks1[i].numberhits < level) //Check brick still exists
bricks1[i].numberhits++ //Add one to hit count
vely = - vely //Reverse ball direction
ballposx = tempballposx + (1-t)* velx //Check final ball position
ballposy = tempballposy + (1-t)* vely //Check final ball position
 Collision detection to the base edge of the brick when the ball is travelling from below.
y1=(bricks1[0].posy-bricks1[0].halfheight) – previous ball position – radius – 1
t = y1/vely
x1 = t*velx
tempballposx = previous ball posx + x1
tempballposy = previous ball posy + y1
for (i=0; i<12;i++)
if (tempballposx>= bricks1[i].posx – halfwidth && tempballposx =< bricks1[i].posx + halfwidth)
if (bricks1[i].numberhits < level) //Check brick still exists
bricks1[i].number hits++ //Add one to hit count
vely = - vely //Reverse the ball direction
ballposx = tempballposx + (1-t)* velx //Check final ball position
ballposy = tempballposy + (1-t)* vely //Check final ball position
To create the collision detection on the bricks, I need to calculate a number of collision detection circumstances, these include:
- ball travelling from below, hits base of brick
- ball travelling from above, hits top of brick
- ball travelling from below, hits right side of brick
- ball travelling from below, hits left side of brick
- ball travelling from above, hits right side of brick
- ball travelling from above, hits left side of brick


 Here is the initial design for the screen, created on the computer.
 The final version of the Enter High Score Board.
 I now have the gym ball, the main controller for the game. During code development I have been using an AIBO ball, as it is very similar in terms of hue and saturation. The AIBO ball has been extremely useful, not only because of it’s colour related properties, but also because of it’s size. The AIBO ball is far smaller than the gym ball and is therefore easier to use when sitting at the computer working on the code.
 To design the cracks I tried a variety of designs on a printscreen of the bricks, using Microsoft Paintbrush. Once I had chosen the brick crack preferred design, I then calculated the pixels which were part of the crack and coded this using the cvLine command. The cracks are created by coding a series of small lines.
 The code is divided into three sections, one for each crack. In level two cracks one, two and three appear on the first collision. In level three cracks one and two appear after the first collision and crack three appears after the second collision.

 To code the brick collision effects I have included checks in an if statement, to check once the brick has been hit if the hit number matches the level number. In the first level, if the brick has been hit once then the player will hear an explosion effect whilst the brick disappears. In the second level of the game, the first time a brick is hit (which is one number less than the level number) the player hears a collision noise and cracks appear on the brick. The second time a brick is hit (the same number of hits as the level number) the player hears an explosion noise and the brick disappears. In the third level, the first hit creates a collision noise and two cracks appear on the brick (this is two hits less than the level number), the second hit creates a collision noise and another crack appears (this is one hit less than the level number) and the third hit causes an explosion noise and the brick disappears (as the hit number equals the level number).


 x1 = (bricks1[i+1].posx – bricks1[i+1].halfwidth) – prevballx – gameball.radius + 4;
 x1 = prevballx – (bricks1[i-1].posx + bricks1[i-1].halfwidth) – gameball.radius – 4;
 Collision detection to the top edge of the brick when the ball is travelling from above.
 Collision detection to the base edge of the brick when the ball is travelling from below.